.en-bref { max-width: 640px; margin: 2em auto; padding: 1.5em 1.8em; color: #3a2d0d; font-family: “Inter”, “Segoe UI”, sans-serif; text-align: left; position: relative; box-sizing: border-box; background: #f7f9f9; border: 1px solid #10b58b; border-left: 6px solid #10b58b; border-radius: 12px; box-shadow: 0 8px 24px rgba(251, 191, 36, 0.15); }
.en-bref h2, .en-bref .en-bref-header { font-size: 1.15em; font-weight: 700; margin-bottom: 0.6em; color: #d97706; }
.en-bref p, .en-bref li { font-size: 1em; line-height: 1.65; margin: 10px; }
.en-bref strong { color: #1c1917; }
.key-takeaways { max-width: 640px; margin: 2em auto; padding: 1.5em 1.8em; color: #3a2d0d; font-family: “Inter”, “Segoe UI”, sans-serif; text-align: left; position: relative; box-sizing: border-box; background: #f7f9f9; border: 1px solid #10b58b; border-left: 6px solid #10b58b; border-radius: 12px; box-shadow: 0 8px 24px rgba(251, 191, 36, 0.15); }
.key-takeaways h2, .key-takeaways .key-takeaways-header { font-size: 1.15em; font-weight: 700; margin-bottom: 0.6em; color: #d97706; }
.key-takeaways p, .key-takeaways li { font-size: 1em; line-height: 1.65; margin: 10px; }
.key-takeaways strong { color: #1c1917; }
.key-takeaways ul { list-style: none; padding-left: 0; }
.key-takeaways li { margin: 0.45em 0; padding-left: 0.2em; }
.magic-pdf-download{margin:2em 0;padding:1.25em 1.5em;border:1px solid #e3e6ea;border-left:4px solid #0ea5e9;border-radius:10px;background:#f8fafc;display:flex;align-items:center;gap:1.2em;flex-wrap:wrap}.magic-pdf-download .mpd-txt{flex:1;min-width:220px}.magic-pdf-download .mpd-txt strong{display:block;font-size:1.05em;color:#0f172a;margin-bottom:.15em}.magic-pdf-download .mpd-txt span{color:#64748b;font-size:.92em}.magic-pdf-download a.mpd-btn{display:inline-block;background:#0ea5e9;color:#fff;text-decoration:none;padding:.7em 1.5em;border-radius:8px;font-weight:600;white-space:nowrap}.magic-pdf-download a.mpd-btn:hover{background:#0284c7}
.magic-lb-overlay{position:fixed;inset:0;background:rgba(15,23,42,.92);display:none;align-items:center;justify-content:center;z-index:99999;cursor:zoom-out;padding:20px}
.magic-lb-overlay.open{display:flex}
.magic-lb-overlay img{max-width:95vw;max-height:95vh;object-fit:contain;border-radius:8px;box-shadow:0 8px 32px rgba(0,0,0,.5)}
.magic-lb-close{position:absolute;top:16px;right:20px;color:#fff;background:rgba(0,0,0,.5);border:none;width:40px;height:40px;border-radius:50%;font-size:24px;cursor:pointer;display:flex;align-items:center;justify-content:center}
.magic-lb-close:hover{background:rgba(0,0,0,.8)}
.wp-block-image img{cursor:zoom-in;transition:transform .15s ease}
.wp-block-image img:hover{transform:scale(1.01)}
.magic-img-link{display:inline-block;text-decoration:none}
(function(){
var ov=document.getElementById(‘magic-lb’);if(!ov)return;
var img=ov.querySelector(‘img’),btn=ov.querySelector(‘.magic-lb-close’);
function open(src){img.src=src;ov.classList.add(‘open’);document.body.style.overflow=’hidden’}
function close(){ov.classList.remove(‘open’);img.src=”;document.body.style.overflow=”}
document.addEventListener(‘click’,function(e){
var a=e.target.closest(‘a.magic-img-link’);
if(a){e.preventDefault();open(a.getAttribute(‘href’));return}
var i=e.target.closest(‘.wp-block-image img’);
if(i&&!e.target.closest(‘a’)){e.preventDefault();open(i.currentSrc||i.src)}
});
ov.addEventListener(‘click’,function(e){if(e.target===ov||e.target===btn)close()});
document.addEventListener(‘keydown’,function(e){if(e.key===’Escape’)close()});
})();
Raising Your Trophies in Brawl Stars Solo: The Quick Method Without a Fixed Team
Raising your trophies in Brawl Stars without a fixed team is based on a simple idea: reducing the element of chance. The most effective approach is not to force spectacular games, but to play a brawler you master, in a mode that forgives mistakes, then stop before the losing streak starts.
This approach targets solo progression with concrete benchmarks: which characters to choose, which modes to prioritize, how to avoid tilt, and when to cut the session. The goal is not to promise magical climbing, but to limit unnecessary defeats and win more consistently, even with random teammates. Updated July 5, 2026.
In Brief
🎯 Solo climbing works better with a reliable brawler than with a flashy pick poorly mastered.
🛡️ Modes that reduce chaos help secure trophies, especially when random teammates play without coordination.
⏱️ Stopping the session after a losing streak prevents losing trophies won earlier.
📈 The most profitable method combines mode choice, discipline, and simple map reading.
How to Raise Your Trophies Without a Fixed Team?
The quick method is to play a mastered brawler, prioritize the most stable modes, then stop the session as soon as the streak turns bad. Solo progression mainly comes from consistency. A brilliant game rarely compensates for three avoidable defeats, especially when the map or teammates do not play in your favor.
- Choose a brawler you already know well and whose range, survivability, and match-ups you understand.
- Aim for a mode where your mistakes cost less, especially if you play with random teammates.
- Look at the map before starting the session, as some areas favor control and others punish fragile picks.
- Play to keep your gains, not to “force” the next trophy every game.
- Stop as soon as concentration drops or two to three defeats follow each other.
Solo progression comes first from games you don’t lose foolishly.
The best push routine always starts with a simple base: a stable brawler, a readable map, and a short session. This logic avoids multiplying character changes, unfavorable lobbies, and unnecessary risks when the streak is already fragile.
Which Brawlers to Choose for Solo Progression?
The best solo characters are those who survive well, punish mistakes, and remain useful even without coordination. A good choice is not necessarily the most spectacular; it’s the one that gives you options when the team doesn’t follow. To sort the meta without getting lost, our analysis of the best brawlers by mode helps filter solid picks, while the guide on which gadgets to prioritize in Brawl Stars prevents wasting resources on an unprofitable build.
The Most Profitable Profiles in Solo
Versatile and self-sufficient brawlers are the easiest to profit from when pushing alone. They better absorb mistakes, maintain a constant threat, and do not depend on a teammate to convert a good position into a real advantage.
| Profile | Solo Interest | Main Limitation | When to Play |
|---|---|---|---|
| Versatile Brawler | Stable on multiple maps, easy to pick up again | Less explosive than a specialist | When you want to secure progress |
| Self-sufficient Brawler | Can survive alone and hold an area | Requires good positioning | When the map opens escape routes |
| Punitive Brawler | Quickly exploits opponent mistakes | Also punishes your bad timings | When the lobby plays too aggressively |
Profiles to avoid at the beginning
Brawlers too dependent on coordination often slow down solo progress. If your effectiveness relies on a partner who engages at the right moment or protects your angle, climbing becomes irregular and depends too much on team randomness.
- Very fragile characters who die quickly from any bad positioning.
- Technical picks that require constant precision to be effective.
- Brawlers only useful in a specific composition.
- Characters that punish your mistakes more than they correct the opponent’s.
A reliable brawler is often better than a spectacular pick if your goal is to climb trophies without a fixed team.
If you are starting out, the priority is not to follow the trend, but to find a character that lets you breathe when the game becomes chaotic. This stability matters more over time than an isolated performance spike.
Which game modes to prioritize for fast progress?
The most effective solo modes are those where you can minimize damage, easily read the map, and turn a good position into a concrete result. Solo Survival often remains the easiest to understand for an individual push, but some objective modes can be safer if your brawler controls them well.
Modes that forgive mistakes best
Solo Survival, certain Hot Zone maps, and matches where survival matters more than direct engagement are generally the most comfortable solo. You gain readability there, and avoid depending on perfect team timing to leave the game with a good result.
| Mode | Solo Interest | Risk | Quick Read |
|---|---|---|---|
| Solo Survival | Very good for progressing without coordination | Lobby randomness can weigh | Survive, avoid unnecessary trades, finish strong |
| Hot Zone | Profitable with good zone control | Bad positioning is costly | Hold space rather than chase eliminations |
| Gem Grab | Interesting if your brawler holds the line | Requires a minimum of cohesion | Play simple, protect the advantage, don’t over-attack |
| Brawl Ball | Good if you know how to defend and stall | Can become very chaotic | Prefer control over forcing |
The right mode is not the one that yields the most on paper, but the one where you lose the least when the game is average. This is often where real progress is built, because a more stable mode allows you to absorb bad lobbies without everything falling apart.
How to organize your sessions to progress without tilting?
An effective solo session is based on a simple rule: push when you are fresh, then stop as soon as your play quality drops. Fatigue causes you to lose more trophies than pure mechanical lack, because it pushes you to restart poorly engaged games instead of accepting a break.
The cleanest routine is to play three to five games with a single clear objective, then take a break if the rhythm deteriorates. This discipline limits impulsive decisions, especially when maps change or random teammates play above or below their usual level.
- Start with your most reliable brawler.
- Stick to the same mode for a small block of games.
- Change plans only if the map becomes clearly unfavorable.
- Stop after two or three consecutive losses.
- Come back later with a simpler goal.
The session should protect your trophy capital, not prove that you can “climb right away.” As soon as you try to recover a loss urgently, the risk level rises and the climb often slows down instead of speeding up.
What mistakes slow down trophy climbing?
The most costly solo mistakes are almost always the same: too much aggression, poor mode choice, and stubbornness on an unfavorable map. They give the impression of going faster in one or two rounds, then destroy the overall push rhythm.
- Playing too aggressively when the game first requires control.
- Changing brawlers every two losses without understanding why the push is stuck.
- Forcing a map that favors another play style.
- Copying a strategy designed for an organized team.
- Continuing to play when concentration drops.
Speed is only useful if it does not destroy your margin of error.
The most common trap is confusing confidence with haste. In solo, winning faster often means fewer unnecessary actions, not a more frantic pace.
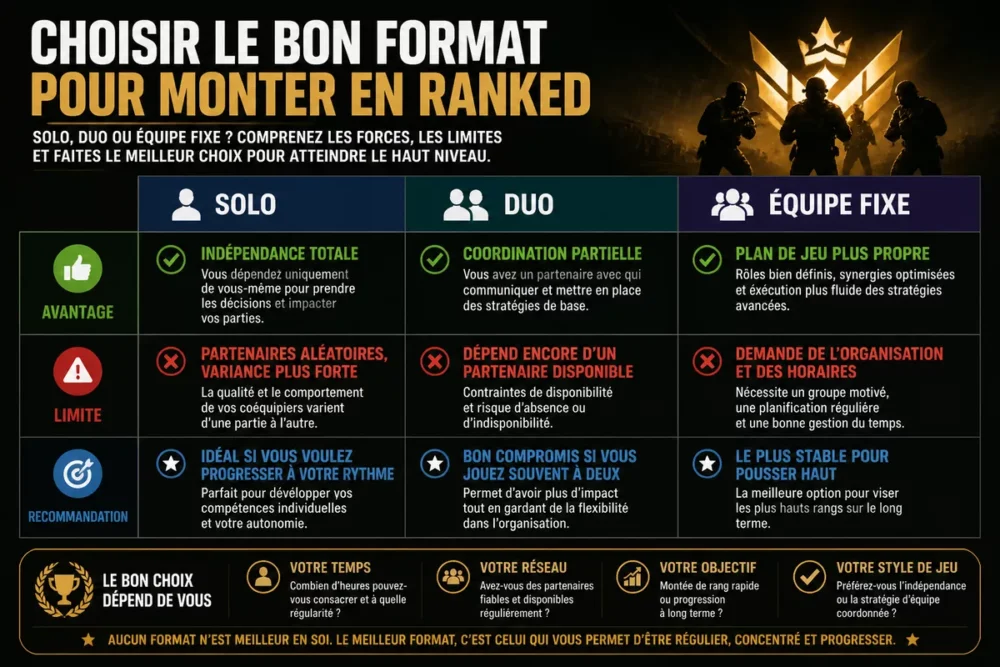
Solo, duo, or fixed team: what to choose?
Solo is used to secure steady progress, duo improves coordination, and a fixed team remains the most stable path when the goal is to push high. If your goal is to climb trophies without relying on available friends, solo remains the simplest base. If you have a reliable partner, duo already reduces some randomness. Our article on the best Duel brawlers can also help understand which profiles handle pressure best in one-on-one.
| Format | Main Advantage | Limitation | Recommendation |
|---|---|---|---|
| Solo | Total independence | Random teammates, higher variance | Ideal if you want to progress at your own pace |
| Duo | Partial coordination | Still depends on an available partner | Good compromise if you often play as a pair |
| Fixed team | Cleaner game plan | Requires organization and scheduling | The most stable for pushing high |
For a solo player, the right strategy is not to copy an organized team’s push, but to reduce opportunities to lose foolishly. This makes progress slower at times, but much more reliable over the long run.
Key Takeaways
- 🎮 Choose a stable brawler before looking for a spectacular character.
- 🗺️ Play modes that best forgive mistakes when pushing solo.
- 🧠 Stop the session after a bad streak to avoid tilt and chain losses.
- 📊 Compare solo, duo, and fixed team according to your real coordination level.
- ⏳ Consistency pays more than flashy moves over a long trophy climb.
Your questions about climbing trophies solo
Can you climb quickly without playing with friends?
Yes, but the climb is steadier than spectacular if you agree to play properly. The right goal is to limit avoidable defeats, not to seek perfect streaks every session.
Which characters should you choose when starting out?
The best choices are brawlers that are simple to handle, capable of surviving and remaining useful without coordination. A stable character will give you more trophies than a technically difficult pick poorly mastered.
Which modes are the most profitable for progressing alone?
Solo Survival is often the clearest, but some objective modes become profitable if your brawler controls the map well. The right mode mainly depends on your ability to hold position without exposing yourself unnecessarily.
Should you play cautiously or aggressively to go faster?
You should play cautiously at the start of the session, then become more aggressive only when the game and map allow it. Systematic aggression often causes you to lose more trophies than you gain.
How to limit defeats with random partners?
The best protection is to choose an autonomous brawler, quickly read the map, and avoid unnecessary engagements. When your partners don’t follow, your safety margin becomes your only real resource.