To connect an old console to a modern television, first identify the console’s video output and the available input on the TV. If the connectors do not match, use an active converter suitable for the signal, then select the correct HDMI or analog source. A simple cable does not always convert the signal.
A retro console can output video via SCART, composite yellow-white-red, S-Video, RF antenna, or proprietary connector. The presence of a jack on each device therefore does not guarantee the image: the TV must also accept the low-resolution, interlaced, or regional format emitted by the console.
In brief
🎮 The first check concerns the actual ports: note the exact model of the console, its region, and the connectors present before buying an accessory.
🔌 An analog output connected to an HDMI input generally requires an active converter, powered separately. A mechanical adapter does not digitize the signal.
🖥️ A stretched, unstable, or absent image may come from the PAL/NTSC format, a poorly handled 240p or 480i signal, incorrect connection, or a wrongly selected HDMI source.
⚙️ For regular gaming, a scaler designed for retro gaming is more relevant than a generic box chosen solely based on the presence of an HDMI port.
Identify your console’s video output and the TV’s inputs
The connection depends first on the console-TV combination. A NES or Super NES can use AV cables on some equipment, while an Atari 2600 may go through an RF input. A modern TV may also reject a low-resolution signal despite physically compatible connectors.
Start by noting the reference written under the console or on its rear label. The same family of machines can change connectors between European, Japanese, or American versions, and a hardware revision may use a different cable.
Then observe the TV’s inputs. Look for an HDMI port, yellow-white-red RCA jacks, a video input shared with a headphone jack, an antenna input, and any adapters supplied with the screen. Do not deduce the presence of a composite input from the color of a connector alone: some TVs combine several functions on the same jack.
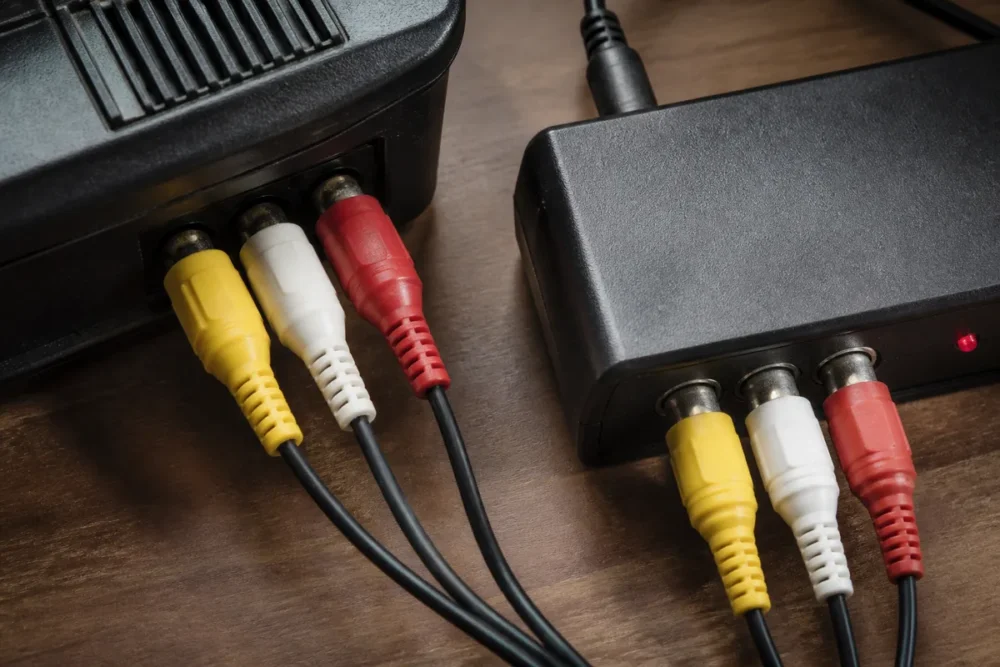
SCART, composite, and antenna output: what each connection carries
SCART carries analog video and audio. The quality notably depends on the wiring actually used by the console: a SCART jack does not automatically mean all available signals are identical.
Composite separates functions by color. The yellow plug carries video, the white plug the left audio channel, and the red plug the right audio channel. A missing plug can explain absence of sound or no image if the video is not connected.
The RF output requires equipment adapted to the model and signal standard; check the documentation of the console, the RF box, and the TV before any purchase.
Proprietary connectors: check the dedicated cable before any conversion
Sega consoles may use different cables depending on the model. The cable must therefore correspond to the exact machine, not just the Sega brand.
Also check the differences between PAL, Japanese NTSC, and American NTSC versions. The regional format can be decisive for color image, signal stability, and acceptance by the converter.
Choosing the Right Connection Chain: Passive Adapter, Active Converter, or Scaler
A passive adapter changes the shape of a connector without transforming the signal. An active converter digitizes an analog signal to produce an output usable by HDMI. A scaler generally adds scaling and more advanced management of retro signals; the choice therefore depends on the actual need.
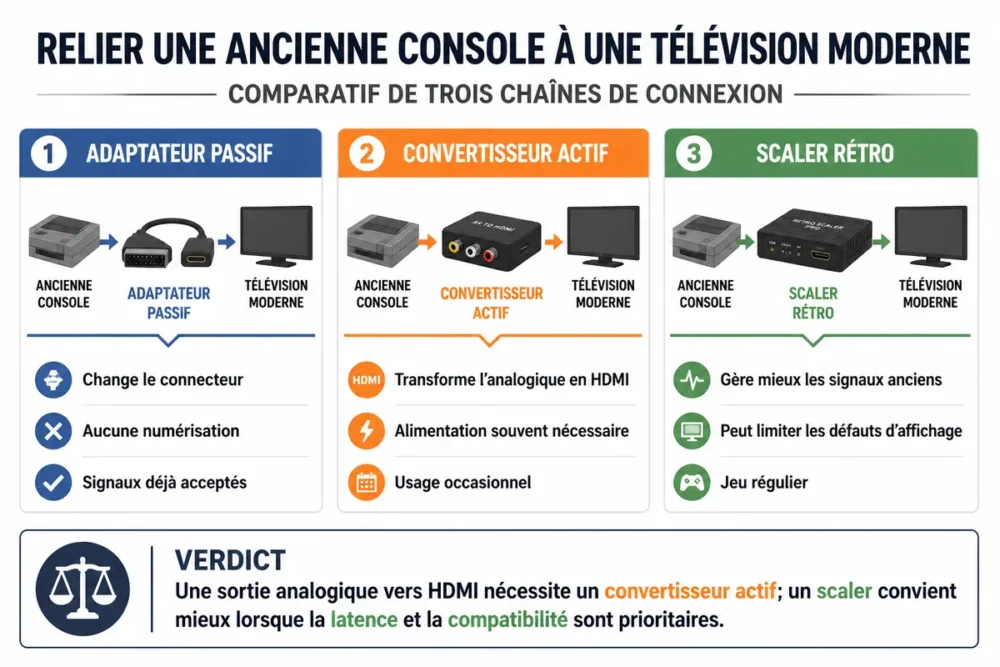
The correct chain always follows this order: console output, appropriate cable, box input, HDMI output, TV input. Check this direction on the technical sheet. A box designed to convert an HDMI source to an analog output is not suitable for the reverse connection.
For a console with SCART output
Use an active SCART to HDMI converter when the TV does not have a compatible analog input. Check the acceptance of the signal emitted by the console, as some boxes only support some of the formats present on a SCART socket.
If the console and cable use an RGB signal, choose equipment that actually supports this mode. A converter designed only for composite can produce a missing, unstable, or lower quality image.
For yellow, white, and red cables
Choose a composite to HDMI converter with a video input and corresponding audio inputs. Plug the yellow plug into the composite video input, then the white and red plugs into the left and right audio channels.
Do not confuse composite and component. The sockets may be close, but a component input expects a different type of signal and does not automatically replace the composite video input.
The converter must also support the PAL or NTSC standard produced by the console. The expected format should appear in the technical specifications or the manufacturer’s documentation; a simple mention of “HDMI compatible” is not enough.
For occasional or regular play
A simple converter may be sufficient to get an image with a console used occasionally. The quality, stability, and display delay remain variable depending on the box and how the TV processes the received signal.
A scaler dedicated to retro gaming becomes more relevant for regular use. It can better handle deinterlacing, low resolutions, and scaling, but it does not recreate details missing from the original signal.
Quick selection table according to the console output
The following table associates each output with the family of connection to look for. The verification column is the most important: it prevents buying an accessory whose connector seems correct but whose input signal does not match.
| Console output | Accessory to look for | TV input | Check before purchase | Connection to avoid |
|---|---|---|---|---|
| SCART | Active SCART to HDMI converter | HDMI | Accepted signal: composite or RGB depending on the cable | HDMI cable alone or converter in the wrong direction |
| Yellow-white-red composite | Composite to HDMI converter | HDMI | PAL or NTSC, separate video and audio | Component input used as composite input |
| Composite | Direct cable if the screen has a compatible input | RCA or shared video input | Actual presence of the video input and source selection | Plugging the yellow plug into an audio input |
| S-Video | Converter explicitly accepting S-Video | HDMI or compatible S-Video input | Regional format and supported signal type | Using a composite adapter that does not separate luminance |
| RF or antenna | Equipment adapted to the model and signal standard | Antenna input or HDMI depending on the chosen channel | Documentation of the console, RF box, and TV | Assuming a modern antenna input accepts all old signals |
| Proprietary connector | Model-specific cable, then converter if necessary | HDMI or analog input | Revision, region, and exact console | Replacing the cable with one from a similar console |
The recommendation is clear: for an analog console and a TV equipped only with HDMI, choose an active converter whose input exactly matches the signal. A mechanical adapter is not sufficient in this configuration.
Connecting the console to the modern TV step by step
The connection is done with the power off, following the signal path without adding unnecessary accessories. Once the console is connected to the converter, the HDMI output of the box must connect to the TV; the selected HDMI source must then correspond to the port used.
-
Cut the power
Turn off the console and the television. Unplug the converter if its power supply is separate. This precaution prevents handling the connectors while the devices are operating.
-
Connect the console
Plug the appropriate cable into the console output. For a composite cable, connect the yellow to video, the white to left audio, and the red to right audio. For a SCART or proprietary connector, insert the plug without forcing.
-
Connect the converter
Connect the console cable to the converter input, then connect the HDMI output of the box to a free HDMI input on the television. Do not use a splitter or additional extension during the initial diagnosis.
-
Power the box
Plug in the power supply provided with the converter according to its documentation. An unpowered box may give the impression that the console or cable is faulty.
-
Select the source
Turn on the console and the television, then press the “Source” button or open the input menu. Select the HDMI port used, for example HDMI 2, and not a neighboring HDMI input.
-
Check the display
Test the console menu or a game. Check the image and sound separately. If the image is stretched, try the 4:3 mode, the original display, or a setting without zoom.
Connect the image and sound to the converter
The yellow cable does not carry sound. The white and red plugs must be connected to the corresponding audio inputs when the console provides stereo sound.
A direct connection remains preferable for the initial diagnosis. Remove splitters, extensions, and other boxes until a stable image is obtained; each additional element adds a possibility of poor contact or incompatibility.
Adjust the source and display of the television
The “Source” button allows you to browse available inputs. Select precisely the input associated with the converter’s HDMI cable, then test the console menu before starting a game.
Old consoles are often designed around a 4:3 display. A “full screen” mode can stretch characters and backgrounds; the 4:3 or “original” setting better preserves proportions, without improving the signal definition.
Troubleshoot a black screen, unstable image, or no sound
A black screen does not automatically indicate a console failure. Four elements must be isolated: the console, the cable, the converter, and the television. Start with the selected source and power, then check the conversion direction and video format compatibility.
The screen remains black or displays “no signal”
First check the TV source, then the power supply of the converter. Make sure the console is turned on and that the box is receiving power when it requires it.
Unplug and replug each connector. Try another HDMI port on the TV without changing multiple settings at once. If the message persists, confirm that the converter supports the resolution and standard produced by the console.
The image is black and white, distorted, or flickering
A black and white image may indicate a PAL/NTSC incompatibility between the console, the converter, and the TV. The problem may also come from a cable intended for another regional variant.
240p and 480i signals can be handled differently depending on the TV. The 240p signal can notably be interpreted as 480i by some screens, then deinterlaced and scaled; artifacts may appear during fast movements.
Next, rule out unstable power supply and a damaged cable. Cross-testing with another cable, another HDMI port, or a compatible screen helps locate the fault without randomly changing regional settings.
The image or sound is missing, or the game lags
For no image, recheck the yellow plug and its video input. For no sound, check the white and red plugs separately, then the audio settings of the TV and the converter.
The display delay comes from signal processing by the converter or the TV. To reduce it, enable game mode if available and favor a converter or scaler specifically designed for retro signals.
Before buying: checks to avoid an incompatible solution
A product sheet stating “HDMI” does not prove that a converter will accept your console. The useful check concerns the exact model, signal type, regional standard, port direction, and handling of low resolutions.
Note this information before any order:
- the brand and exact model of the console;
- the region or video standard: PAL, European NTSC, Japanese or American;
- the shape and type of output: SCART, composite, S-Video, RF or proprietary connector;
- the inputs actually available on the TV;
- the announced compatibility with 240p, 288p, 480i or 480p signals when the console uses them;
- the power supply required by the converter and the input-output direction.
Example decision: composite output to HDMI-only TV: active composite-to-HDMI converter; RGB SCART signal: converter explicitly accepting RGB; regular use: retro scaler documenting 240p compatibility.
RF output requires equipment adapted to the model and signal standard; check the documentation of the console, RF box, and TV before any purchase.
The terms “HD image” or “upscale” describe scaling, not the creation of additional details. An HD TV generally converts standard definition signals to a higher definition, but the final rendering also depends on deinterlacing, aspect ratio, and screen processing.
Advanced solutions address distinct needs. Scanline generators can recreate scan lines, line doublers can multiply the lines of an image, and some HDMI modifications allow compatible consoles to output 1080p directly. These options do not replace model verification and may require specialized installation.
Connections are not interchangeable: a Wii can use its AV cable on RCA inputs, while PlayStation 1 and 2 can be found with RF, composite, S-Video, or HDMI options depending on the chosen equipment.
To check the characteristics of an accessory, first consult the manufacturer’s documentation. General explanations about upscaling, 240p, and 480i do not replace the technical sheet of the chosen converter.
The reliable method remains simple: start from the signal actually emitted by the console, identify the input accepted by the television, then choose an active conversion when the formats differ. Do not trust a cable presented as universal if its technical specifications do not specify the direction of conversion or the supported standards.
Frequently Asked Questions
Can an old console be connected directly to a modern television without a converter?
Yes, if the television has an input compatible with the console’s output, for example a composite input for a yellow-white-red cable. If the TV only has HDMI inputs, an active conversion is generally necessary.
Is a SCART to HDMI adapter always sufficient?
No. A SCART to HDMI box must accept the type of signal actually provided by the console, notably composite or RGB depending on the cable. An adapter designed for HDMI to SCART is not suitable.
Why does my old console display a black and white image?
The PAL or NTSC format may not match between the console, the converter, and the television. Also check the cable used, as a different regional or hardware version can produce an incompatible signal.
Why does the screen remain black even though the converter is plugged in?
Check the selected HDMI source, the converter’s power supply, the input-output direction, and the plug insertion. Then try another HDMI port and confirm that the box accepts the console’s low-resolution signal.
How to reduce image lag with a retro console?
Activate the TV’s game mode when available and avoid unnecessary image processing. A scaler designed for retro gaming may be preferable to a generic converter, but the exact latency should be checked in its documentation.
Does a European PAL console work with a converter sold for NTSC?
Not necessarily. The converter must indicate that it accepts PAL if the European console produces this standard. A mention limited to NTSC does not guarantee a stable image or correct colors with a PAL console.