.en-bref { max-width: auto; margin: 2em auto; padding: 1.5em 1.8em; color: #78350f; font-family: “Inter”, “Segoe UI”, sans-serif; text-align: left; position: relative; box-sizing: border-box; background: #fff2d7; border: 0; border-left: 0px solid #b45309; border-radius: 0; box-shadow: none; }
.en-bref h2, .en-bref .en-bref-header { font-size: 1.15em; font-weight: 700; margin-bottom: 0.6em; color: #b45309; }
.en-bref p, .en-bref li { font-size: 1em; line-height: 1.65; margin: 10px; }
.en-bref strong { color: #451a03; }
.mg-callout{margin:1.5em 0;padding:.9em 1.1em;border:1px solid;border-left-width:4px;border-radius:10px;font-size:.97em;line-height:1.65}.mg-callout>:first-child{margin-top:0}.mg-callout>:last-child{margin-bottom:0}.mg-callout__label{display:block;margin:0 0 .35em;font-weight:700;font-size:.82em;letter-spacing:.03em;text-transform:uppercase}.mg-callout__label::before{margin-right:.45em;font-size:1.05em;vertical-align:-.06em}.mg-callout–info{background:#eff6ff;border-color:#bfdbfe;color:#1e3a5f}.mg-callout–info .mg-callout__label{color:#2563eb}.mg-callout–info .mg-callout__label::before{content:”\2139\FE0F”}.mg-callout–tip{background:#f0fdf4;border-color:#bbf7d0;color:#14532d}.mg-callout–tip .mg-callout__label{color:#15803d}.mg-callout–tip .mg-callout__label::before{content:”\1F4A1″}.mg-callout–warning{background:#fffbeb;border-color:#fde68a;color:#7a4a10}.mg-callout–warning .mg-callout__label{color:#b45309}.mg-callout–warning .mg-callout__label::before{content:”\26A0\FE0F”}.mg-callout–danger{background:#fef2f2;border-color:#fecaca;color:#7f1d1d}.mg-callout–danger .mg-callout__label{color:#dc2626}.mg-callout–danger .mg-callout__label::before{content:”\1F6D1″}.mg-proscons{display:grid;grid-template-columns:1fr 1fr;gap:16px;margin:1.5em 0}@media(max-width:560px){.mg-proscons{grid-template-columns:1fr}}.mg-proscons__col{padding:.9em 1.1em;border:1px solid;border-radius:10px}.mg-proscons__title{display:flex;align-items:center;gap:.4em;margin:0 0 .5em;font-weight:700;font-size:.9em;letter-spacing:.02em}.mg-proscons__col ul{margin:.3em 0 0;padding-left:1.15em}.mg-proscons__col li{margin:.3em 0;line-height:1.55}.mg-proscons__col–pro{background:#f0fdf4;border-color:#bbf7d0;color:#14532d}.mg-proscons__col–pro .mg-proscons__title{color:#15803d}.mg-proscons__col–pro .mg-proscons__title::before{content:”\2705″}.mg-proscons__col–con{background:#fef2f2;border-color:#fecaca;color:#7f1d1d}.mg-proscons__col–con .mg-proscons__title{color:#dc2626}.mg-proscons__col–con .mg-proscons__title::before{content:”\274C”}ol.mg-steps{list-style:none!important;counter-reset:mgstep;margin:1.6em 0;padding-left:0!important}ol.mg-steps>li.mg-steps__item{counter-increment:mgstep;list-style:none!important;padding-left:0!important;padding-bottom:1.4em}ol.mg-steps>li.mg-steps__item:last-child{padding-bottom:0}ol.mg-steps>li.mg-steps__item>:last-child{margin-bottom:0}ol.mg-steps>li.mg-steps__item>.mg-steps__title{margin:0 0 .25em;font-weight:600}ol.mg-steps>li.mg-steps__item>.mg-steps__title::before{content:counter(mgstep) “. “;opacity:.45;font-weight:500;font-variant-numeric:tabular-nums}ol.mg-steps>li.mg-steps__item:not(:has(.mg-steps__title))::before{content:counter(mgstep) “. “;opacity:.45;font-weight:500;font-variant-numeric:tabular-nums}.mg-kpis{display:grid;grid-template-columns:repeat(auto-fit,minmax(140px,1fr));gap:14px;margin:1.5em 0}.mg-kpi{padding:1em .9em;border:1px solid #e5e7eb;border-radius:12px;background:#f9fafb;text-align:center}.mg-kpi__value{display:block;font-size:1.7em;font-weight:800;line-height:1.15;color:#111827}.mg-kpi__label{display:block;margin-top:.35em;font-size:.85em;color:#6b7280;line-height:1.35}
.wp-block-image,.ai-image{margin-bottom:1.75em}.wp-block-image>figcaption,.ai-image>figcaption{margin-top:.5em}
.magic-lb-overlay{position:fixed;inset:0;background:rgba(15,23,42,.92);display:none;align-items:center;justify-content:center;z-index:99999;cursor:zoom-out;padding:20px}
.magic-lb-overlay.open{display:flex}
.magic-lb-overlay img{max-width:95vw;max-height:95vh;object-fit:contain;border-radius:8px;box-shadow:0 8px 32px rgba(0,0,0,.5)}
.magic-lb-close{position:absolute;top:16px;right:20px;color:#fff;background:rgba(0,0,0,.5);border:none;width:40px;height:40px;border-radius:50%;font-size:24px;cursor:pointer;display:flex;align-items:center;justify-content:center}
.magic-lb-close:hover{background:rgba(0,0,0,.8)}
.wp-block-image img{cursor:zoom-in;transition:transform .15s ease}
.wp-block-image img:hover{transform:scale(1.01)}
.magic-img-link{display:inline-block;text-decoration:none}
(function(){
var ov=document.getElementById(‘magic-lb’);if(!ov)return;
var img=ov.querySelector(‘img’),btn=ov.querySelector(‘.magic-lb-close’);
function open(src){img.src=src;ov.classList.add(‘open’);document.body.style.overflow=’hidden’}
function close(){ov.classList.remove(‘open’);img.src=”;document.body.style.overflow=”}
document.addEventListener(‘click’,function(e){
var a=e.target.closest(‘a.magic-img-link’);
if(a){e.preventDefault();open(a.getAttribute(‘href’));return}
var i=e.target.closest(‘.wp-block-image img’);
if(i&&!e.target.closest(‘a’)){e.preventDefault();open(i.currentSrc||i.src)}
});
ov.addEventListener(‘click’,function(e){if(e.target===ov||e.target===btn)close()});
document.addEventListener(‘keydown’,function(e){if(e.key===’Escape’)close()});
})();
To clean a yellowed retro console, start by distinguishing dirt deposited on the casing from a true discoloration of the plastic. The former is treated with a barely damp microfiber cloth; the latter does not necessarily disappear with a cleaning product.
Turn off the console, remove the cables, and separate the electronic parts from the casing before any wet cleaning. Hydrogen peroxide or a Retr0bright-type treatment can damage the plastic, cause stains, and present a chemical risk: this is not the first step, but an advanced restoration.
In brief
- 🧼 Gentle cleaning: dry or barely damp microfiber for the casing, slightly damp cotton swabs in the corners.
- ⚠️ Electronics, screen, and inscriptions: never immerse them or apply peroxide on them.
- 🔎 True yellowing: if the color remains uniform after degreasing, the plastic is probably deeply discolored.
- 🧪 Retr0bright: delicate treatment, without a universal verifiable concentration or duration; reserve it for disassembled and replaceable casings.
Why does the plastic of a retro console yellow?
Yellowing sometimes corresponds to a modification of the plastic itself, and not to a layer of dust. Light, material aging, and its environment can alter its appearance, but the exact cause depends on the composition of the part and the model concerned.
Dirt, grease, or discoloration: how to tell the difference?
Examine the console under uniform light before disassembling it. Fingerprints, greasy deposits, and dark areas often follow handled spots; a truly yellowed casing rather shows a tint integrated into the material, visible even after careful cleaning.
Try on a small, inconspicuous area with a barely damp microfiber and slightly soapy water. If the surface becomes clean but retains a uniform yellow tint, you are facing plastic discoloration and not simple dirt.
When should you give up on chemical restoration?
Do not attempt to whiten a rare, signed, or hard-to-replace casing if you do not master disassembly. An uneven treatment can leave marbling or alter the surface appearance in a way that is difficult to reverse.
Extra caution is even more important for a console whose inscriptions, stickers, or transparent parts have historical value. In this case, preserving the traces of time may be preferable to seeking a uniform color.
Preparing to clean a yellowed retro console
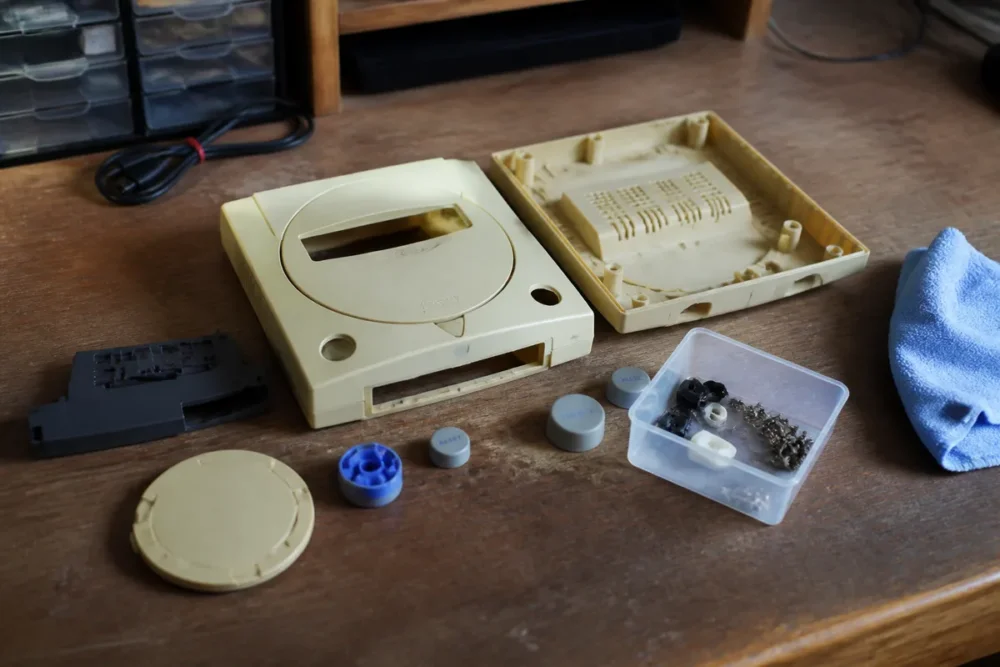
Preparation consists of isolating sensitive parts and gathering non-aggressive materials. Exterior cleaning does not necessarily require complete disassembly, but any part intended to receive water or a product must be separated from the electronics.
Recommended materials
- One or more clean, dry, lint-free microfiber cloths;
- Cotton swabs for buttons, grooves, and joints;
- Lukewarm water and a small amount of mild soap;
- A clean container for screws and small parts;
- Gloves and protective glasses only if a chemical product is planned;
- A dry, well-lit, and sufficiently ventilated workspace.
Avoid accessories already loaded with dust or grease. A dirty microfiber can move particles on the casing and create fine marks, especially on glossy plastic.
Essential precautions
- Unplug the console and remove cartridges, memory cards, and accessories.
- Photograph the cables and screw locations before disassembly.
- Separate the casing, buttons, and electronic elements.
- Place screws in an identified container to avoid incorrect reassembly.
- Never clean an electronic board by immersion.
- Let each piece dry completely before putting it back in place.
On a portable console, the screen is a separate part. Even when integrated into the casing, its cleaning must remain very localized and done with a dry or barely damp microfiber, without solvent.
Cleaning a Yellowed Retro Console with a Gentle Method
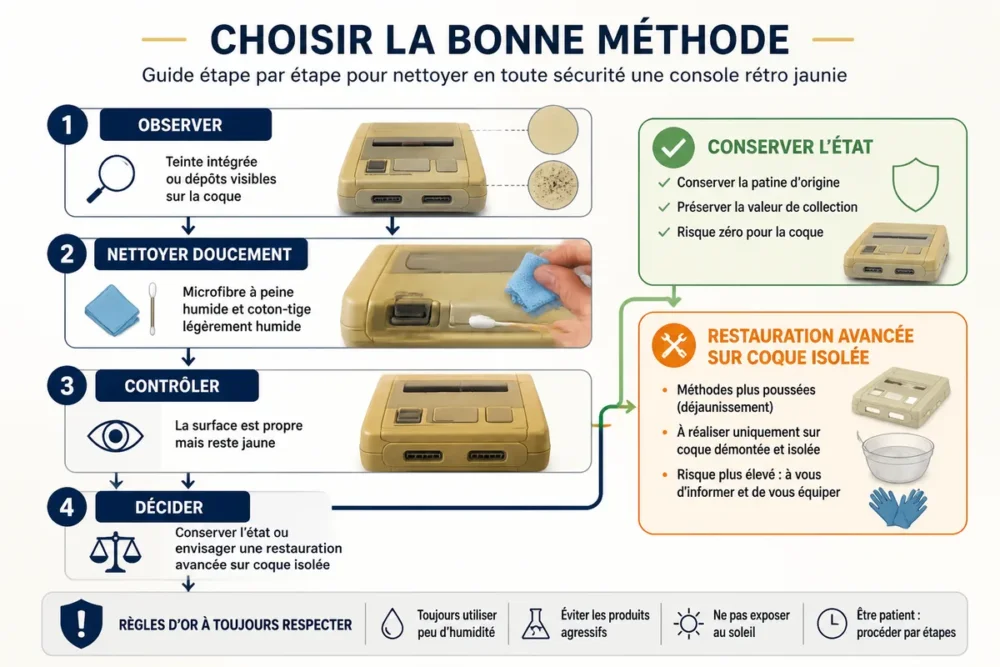
The gentle method should always precede bleaching the shell. It removes dust, greasy marks, and surface deposits without unnecessarily attacking the plastic or markings.
Step 1: Dust the Shell and Crevices
Start by removing dust dry with a microfiber cloth. For grooves, buttons, and joints, use a slightly damp cotton swab, without letting liquid run into openings.
The contacts of a Game Boy must remain particularly dry. Gently blow off dust without forcing and do not introduce liquid into the cartridge slot.
Step 2: Clean the Plastic Without Scratching the Surface
Slightly dampen the microfiber with soapy water, wring it out carefully, then work in small areas. Do not pour the mixture directly on the console and do not vigorously rub a stubborn mark.
The cloth must be damp to the touch, never dripping. Then go over it again with a clean microfiber cloth that is barely damp, then dry with a third dry section of the fabric.
Step 3: Preserve Inscriptions and Stickers
Clean around inscriptions rather than rubbing them directly. Screen prints, painted logos, and labels can react differently to rubbing or solvents, even when the nearby plastic seems resistant.
For a retro controller, remove the buttons if you are confident with disassembly and clean them separately. Membranes and circuits remain out of water; only the separated plastic parts can be washed and then dried.
Step 4: Clean the Screen and Connectors
For the screen, use a dry or barely damp microfiber and exclude solvents. Do not spray any liquid on the panel, slots, speakers, or controls.
Connectors are not treated like a shell. First remove dust without excessive pressure and avoid multiplying products when the problem simply comes from a visible deposit.
| Part | Cautious Method | To Avoid |
|---|---|---|
| Separate Shell | Barely damp microfiber, soapy water, complete drying | Immersion of electronics, abrasive rubbing |
| Buttons | Slightly damp cotton swab or separate washing if disassembled | Liquid in switches and membranes |
| Screen | Dry or barely damp microfiber | Solvent, direct spraying, strong pressure |
| Contacts | Gentle dusting and visual inspection | Forcing, scraping or wetting the circuit |
| Inscriptions | Very light peripheral cleaning | Abrasive sponge, untested solvent |
To put the console back into context, you can also consult this guide dedicated to the choice of a retro console. Cleaning and aesthetic condition should not, however, overshadow the conservation value of old models.
What to Do If the Yellowing Remains Visible?
If the shell is clean but remains yellow, additional cleaning will probably not change the color of the plastic. Treatment with peroxide like Retr0bright targets this discoloration, but it falls under restoration and carries more risks than routine maintenance.
Should You Use Hydrogen Peroxide on a Yellowed Shell?
Hydrogen peroxide is involved in Retr0bright protocols combined with exposure to UV or light. The concentrations, formulations, and durations observed do not constitute a universal verified recipe for all consoles.
Never apply peroxide on electronics, a screen, a sticker, or a part whose plastic is not identified. The concentrated product can cause a chemical burn; gloves and protective glasses are necessary when handling it.
Before any treatment, completely remove the electronic components from the shell. Then clean the plastic with soapy water, rinse it carefully, and dry it thoroughly. Testing on a discreet area is essential, without guaranteeing that the result will be uniform across the entire piece.
Why are homemade recipes difficult to replicate?
Recipes mentioning volumes, oxidizing creams, or thickened mixtures do not necessarily describe the same product or conditions. An indication found for a specific shell does not allow deducing a safe dosage for a Game Boy, a SNES, a Dreamcast, or an Amiga.
The appearance must also be monitored during treatment. In case of stains, color differences, a matte surface, or an unexpected reaction, stop the operation and rinse the piece according to the safety instructions of the product used. Do not try to compensate for a light area by increasing the duration or concentration.
Are baking soda and the magic sponge good alternatives?
Baking soda can become abrasive when rubbed on plastic or inscriptions. It is not a proven solution against yellowing embedded in the material.
A magic sponge works by micro-abrasion. Used vigorously, it can leave micro-scratches and make the plastic matte; it should therefore be avoided on shiny surfaces, logos, and transparent areas.
Isopropyl alcohol can remove grease or surface residues, but it does not act on chemical yellowing. Its compatibility with paint, screen printing, or stickers must be checked on a hidden area before any application.
Which method to choose depending on the condition of the console?
The right choice mainly depends on the nature of the mark and the value of the piece. In most cases, gentle cleaning offers the best balance between aesthetic gain and risk; chemical bleaching is only justified on a removable shell, tested and deemed replaceable.
| Observed condition | Recommended action | Why |
|---|---|---|
| Greasy marks or dust | Microfiber and very mild soapy water | The problem is superficial |
| Clean but yellowed shell | Keep or consider a separate restoration | The plastic is probably discolored |
| Rare or signed piece | Minimal cleaning, no peroxide | The aesthetic and heritage risk is high |
| Yellowed screen or sticker | Do not apply shell treatment | These elements are not treated like bare plastic |
For collectors, authenticity also matters in evaluating a set. Preserving an authentic retro cartridge should not be compromised by overly aggressive aesthetic restoration.
Common mistakes to avoid
Damage rarely comes from a lack of product. It usually results from misplaced liquid, too vigorous rubbing, or chemical treatment applied without diagnosis.
- Cleaning the console while plugged in: a drop can reach an opening or a circuit. Unplug and remove the battery when accessible.
- Confusing yellowed plastic with dirt: multiplying solvents does not lighten an embedded discoloration and increases the risk of marks.
- Rubbing inscriptions: painted logos and stickers can fade before the shell changes appearance.
- Using a magic sponge on the entire shell: micro-abrasion can create a matte area impossible to harmonize.
- Reproducing a dosage found online: products and plastics differ; varying concentrations and durations do not allow for a universal rule.
Dry, reassemble and check the console
Drying is a safety step, not just a finishing touch. Place the plastic parts in a clean, ventilated area, then visually check the grooves, screw housings, and hollow areas before reassembly.
Check the parts before powering on
- Make sure no drops remain in the buttons, ports, or openings.
- Inspect the ribbons, contacts, and connectors for any residual moisture.
- Reassemble the shell without pinching any cables or forcing a screw.
- Test the controls and display before closing the console permanently.
If a part has been exposed to a chemical product, prioritize the rinsing and safety instructions on its label. If in doubt about an electronic board, do not power on the console and seek advice from a repair technician.
How to prevent yellowing from returning?
Storage does not restore plastic that has already discolored, but it limits further damage. Keep the console clean and dry, away from a window and heat source, without enclosing it in packaging that retains moisture.
Light and periodic dusting prevents grease and particles from accumulating in the grooves. Always use a clean cloth and work on a powered-off console; short maintenance is less risky than aggressive catch-up cleaning sessions.
When to stop and what to remember
Cleaning a yellowed retro console starts with a microfiber cloth, a very small amount of soapy water, and a visual diagnosis. Peroxide is not a common cleaner: it is advanced restoration, with a risk of burning, staining, and plastic damage.
For a rare or fragile part, preserving the inscriptions and original condition is often the most reasonable choice. The best result is not necessarily a perfectly white shell, but a clean, functional console treated without additional damage.
Frequently Asked Questions
Can you clean a retro console without disassembling it?
Yes, for very light external dusting, provided the console is unplugged and no liquid is allowed to run. To wash a shell or treat yellowing, disassembly becomes necessary to isolate the electronics.
Is baking soda recommended to whiten a shell?
Baking soda is not a proven solution against yellowing embedded in the plastic. Rubbing it on the surface can become abrasive and mark the shell or inscriptions.
Can household alcohol be used on a retro console?
Avoid household alcohol, whose composition may contain additives or solvents incompatible with certain surfaces. Isopropyl alcohol can remove greasy residues, but always test its compatibility on a hidden area and do not use it on a screen or inscription without verification.
How to clean a yellowed retro controller?
Unplug it, separate the buttons if you are confident with disassembly, then clean the plastic parts with a microfiber cloth or mild soapy water. Circuits, membranes, and contacts must not be immersed.
Will the plastic look like new after peroxide treatment?
This result cannot be guaranteed. Retr0bright can change the appearance of the shell, but it can also cause uneven discoloration or other damage; yellowing may also reappear, with no universally verifiable timeframe.
Useful Sources to Consult
INRS: safety data sheets related to hydrogen peroxide and the risks of chemical burns; to be consulted before any handling.
Documentation from the product manufacturer: concentration, protective equipment, storage, and procedures to follow in case of contact; it takes precedence over a recipe found on a forum.
Technical documentation of the console: disassembly, materials, and precautions specific to the model; it helps distinguish a removable shell from a screen or an integrated electronic component.