.en-bref { max-width: 640px; margin: 2em auto; padding: 1.5em 1.8em; color: #3a2d0d; font-family: “Inter”, “Segoe UI”, sans-serif; text-align: left; position: relative; box-sizing: border-box; background: #f7f9f9; border: 1px solid #10b58b; border-left: 6px solid #10b58b; border-radius: 12px; box-shadow: 0 8px 24px rgba(251, 191, 36, 0.15); }
.en-bref h2, .en-bref .en-bref-header { font-size: 1.15em; font-weight: 700; margin-bottom: 0.6em; color: #d97706; }
.en-bref p, .en-bref li { font-size: 1em; line-height: 1.65; margin: 10px; }
.en-bref strong { color: #1c1917; }
.key-takeaways { max-width: 640px; margin: 2em auto; padding: 1.5em 1.8em; color: #3a2d0d; font-family: “Inter”, “Segoe UI”, sans-serif; text-align: left; position: relative; box-sizing: border-box; background: #f7f9f9; border: 1px solid #10b58b; border-left: 6px solid #10b58b; border-radius: 12px; box-shadow: 0 8px 24px rgba(251, 191, 36, 0.15); }
.key-takeaways h2, .key-takeaways .key-takeaways-header { font-size: 1.15em; font-weight: 700; margin-bottom: 0.6em; color: #d97706; }
.key-takeaways p, .key-takeaways li { font-size: 1em; line-height: 1.65; margin: 10px; }
.key-takeaways strong { color: #1c1917; }
.key-takeaways ul { list-style: none; padding-left: 0; }
.key-takeaways li { margin: 0.45em 0; padding-left: 0.2em; }
.magic-lb-overlay{position:fixed;inset:0;background:rgba(15,23,42,.92);display:none;align-items:center;justify-content:center;z-index:99999;cursor:zoom-out;padding:20px}
.magic-lb-overlay.open{display:flex}
.magic-lb-overlay img{max-width:95vw;max-height:95vh;object-fit:contain;border-radius:8px;box-shadow:0 8px 32px rgba(0,0,0,.5)}
.magic-lb-close{position:absolute;top:16px;right:20px;color:#fff;background:rgba(0,0,0,.5);border:none;width:40px;height:40px;border-radius:50%;font-size:24px;cursor:pointer;display:flex;align-items:center;justify-content:center}
.magic-lb-close:hover{background:rgba(0,0,0,.8)}
.wp-block-image img{cursor:zoom-in;transition:transform .15s ease}
.wp-block-image img:hover{transform:scale(1.01)}
.magic-img-link{display:inline-block;text-decoration:none}
(function(){
var ov=document.getElementById(‘magic-lb’);if(!ov)return;
var img=ov.querySelector(‘img’),btn=ov.querySelector(‘.magic-lb-close’);
function open(src){img.src=src;ov.classList.add(‘open’);document.body.style.overflow=’hidden’}
function close(){ov.classList.remove(‘open’);img.src=”;document.body.style.overflow=”}
document.addEventListener(‘click’,function(e){
var a=e.target.closest(‘a.magic-img-link’);
if(a){e.preventDefault();open(a.getAttribute(‘href’));return}
var i=e.target.closest(‘.wp-block-image img’);
if(i&&!e.target.closest(‘a’)){e.preventDefault();open(i.currentSrc||i.src)}
});
ov.addEventListener(‘click’,function(e){if(e.target===ov||e.target===btn)close()});
document.addEventListener(‘keydown’,function(e){if(e.key===’Escape’)close()});
})();
Create Your First Game on Roblox Studio: Simple Guide to Start and Publish
To create a Roblox Studio game, start with a simple project, install the free editor, add some playable objects, test often, then publish a small stable experience. A first game doesn’t need to be impressive: it should be understandable, playable, and clean enough for someone else to enter without getting lost.
The real challenge at the beginning isn’t 3D, but the method: understanding the interface, choosing a reasonable starting template, adding minimal Lua logic, and avoiding settings that break the test. This guide follows that order, with short steps, concrete benchmarks, and a simple goal: to get a first playable experience quickly.
In Brief
🧭 Roblox Studio is the free editor used to create, test, and publish a Roblox experience.
🛠️ A mini-obby, a small exploration map, or a collection game is enough to learn without overload.
🧪 The right reflex is to test after each addition, not at the end of the project.
🔐 Publishing mainly requires checking the name, settings, and game stability.
How to Prepare Roblox Studio and Your Account?
Roblox Studio is the free editor to install before any other setting, and a properly secured Roblox account already avoids many initial blockages. For a first project, you mainly need clean access to your account, a computer capable of running the tool, and an uninterrupted work slot. If you want to better situate the platform before starting, our Roblox 2025 guide provides a useful framework.
The best preparation remains very concrete: secure access, install the tool, then create a first backup as soon as you open it. This trio avoids work losses and hesitation when you start placing the first game elements.
- Check that you can access your Roblox account with a reliable email address.
- Activate the basic protections offered by the platform as soon as possible.
- Download Roblox Studio from the official Roblox website, then open it for the first time.
- Prepare a quiet session for your first trials, without spreading yourself across multiple projects.
- Keep the habit of saving a clean version before each major modification.
Roblox Studio only becomes useful if you can save, test, and go back without losing your work.
How to Discover the Interface Without Stress?
Roblox Studio becomes much more readable when you only open five panels at the start: Viewport, Explorer, Properties, Toolbox, and Script Editor. The rest can wait; these landmarks are enough to place an object, adjust its properties, and start a script without getting lost in the menus.
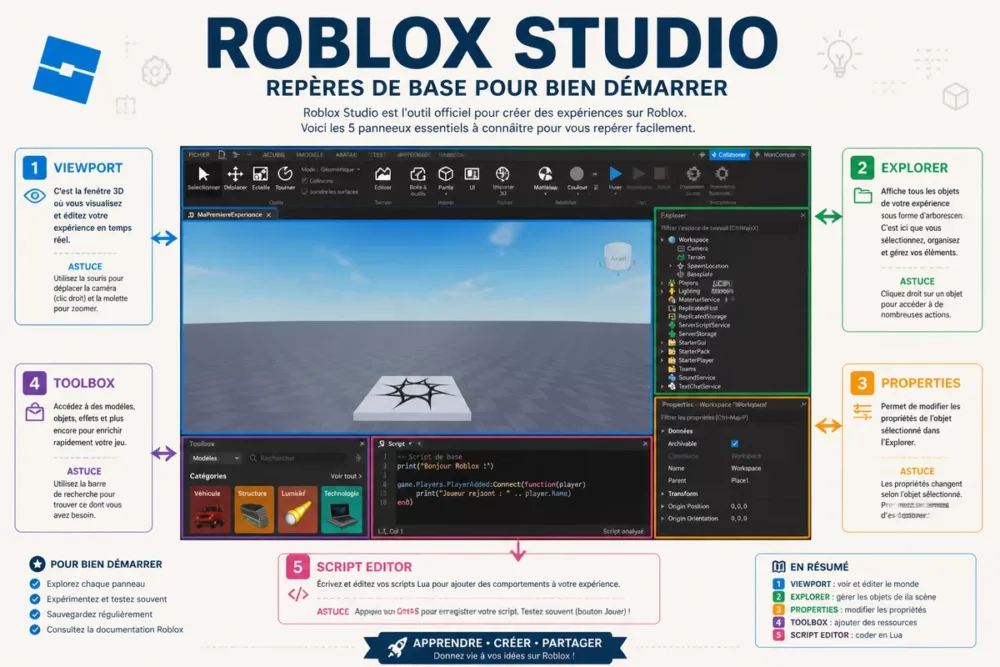
The right reflex is to keep the window simple, then dock the panels in the same place each session. You save time from the second try because you find your tools without searching through menus or reopening unnecessary windows.
- Viewport: the area where you see and move your world.
- Explorer: the hierarchy of game objects.
- Properties: the precise settings of the selected object.
- Toolbox: ready-to-use content to be used with caution.
- Script Editor: the space where you write Lua.
Which First Game to Choose to Start?
The best first project is not the most ambitious; it is the one you can finish, test, and explain in a few minutes. To create a game on Roblox, the simple obby, the mini exploration map, and the basic collection game are the three cleanest starting points.
| Type of First Game | Why Choose It | Difficulty | Limit |
|---|---|---|---|
| Simple Obby | Teaches platform placement, collisions, and checkpoints | Low | Can become repetitive if the scenery adds nothing |
| Mini Exploration Map | Works on spatial reading and navigation | Low to Medium | Requires a bit more scenery |
| Basic Collection Game | Adds simple logic with score or items to collect | Medium | Requires a first Lua script |
For a very first try, the obby often remains the simplest because it teaches placement, level reading, and checkpoints without multiplying systems. If you also want to understand the overall interest of the platform before going further, our Roblox 2025 review helps set the framework.
A successful first game is a finished game, not an endless prototype.
How to Create the First Scene Step by Step?
To create the first scene, work in four steps: choose a simple model, place a clear ground, add a spawn point, and keep a short path. This sequence quickly produces a playable result without drowning you in scenery or unnecessary settings.
- Choose a simple starting model to avoid an overly heavy project from day one.
- Define a clear ground and an easy-to-read circulation area for the player.
- Add a spawn point, then some simple obstacles or spaced platforms.
- Check that the level can be traversed at a glance, without detours or visual blockages.
Step 1: Choose a Simple Model
Starting from a blank model or a very simple template reduces mental load from the beginning. You see the game structure without struggling with an already overloaded scenery, and you can decide faster what really serves your first level.
Step 2: Place the Ground and Boundaries
A clear ground and visible boundaries immediately provide a clean reading of the level. The player understands where to go, you understand where to place objects, and the scene gains clarity without requiring advanced visual effects.
Step 3: Add the spawn and obstacles
The spawn point and the first obstacles turn the scene into a game, not just a set. Place few elements, but place them well: a clear start, a passage to cross, and a simple goal are enough to create a first playable loop.
Step 4: Make the level readable
Readability is better than visual richness on a first project. Keep distinct colors, avoid objects overlapping without reason, and test the scene at player height to see if the path remains obvious.
How to add a first Lua script?
A first Lua script should serve a single visible mechanic: checkpoint, score, or test message. As soon as the script does more than one thing, beginners often lose track; stick to a short, readable behavior that is easy to fix.
Lua is used to link a player action to a precise reaction, not to complicate the game right away.
local checkpoint = script.Parent

checkpoint.Touched:Connect(function(otherPart)
    local character = otherPart.Parent
    local player = game.Players:GetPlayerFromCharacter(character)
    if player then
        print(player.Name .. " a touché le checkpoint")
    end
end)
This basic script is used to check that the object reacts properly when a player touches it. For a beginner, the important thing is not to build complex logic, but to understand where to place the script, which object it monitors, and how to read the result in the test.
- Place the script on the object that should react, not in a random folder.
- Start Play mode to verify that the event really triggers.
- Fix one error at a time so as not to mask the cause of the problem.
- Keep the script short until you have validated the basic behavior.
How to test your game before publishing?
Testing quickly is better than fixing too late: each addition must go through Play mode before moving on. This habit reveals collisions, bad spawn points, and misplaced scripts before the project becomes complicated.
The right test is not the one that reassures; it’s the one that shows what breaks.
- Check that the player appears in the right place.
- Make sure platforms can be crossed without blocking.
- Test the script’s action on a real character in Play mode.
- Watch the camera to see if the level remains readable.
- Run a test again after each correction, even minor.
If a problem recurs twice, stop adding content and fix the base first. A stable first game is better than a bigger but fragile map, especially when you want to publish a first playable experience.
How to publish your first game on Roblox?
Publishing a first Roblox experience mainly involves cleaning up the project, checking settings, and confirming visibility. Monetization comes later; for a first game, the real goal remains a stable version that loads properly on another player’s device.
- Check the project name and description before going online.
- Save a final clean version before publishing.
- Check the visibility and access settings of the game.
- Run a test session after publishing to verify the actual result.
Game Passes and Developer Products can come later, when the game loop is stable. Adding them too early blurs the priority: first a playable game, then only monetization and extension options.
Create a Roblox Studio game or use Scratch, Construct 3, or Unity?
If your goal is to release a Roblox game, Roblox Studio remains the most direct route. Scratch is used to learn logic, Construct 3 to prototype 2D, and Unity to aim for a broader engine with more learning.
| Tool | Purpose | Main advantage | Limit | Recommendation |
|---|---|---|---|---|
| Scratch | Learn basic logic | Very easy to get started with | Not made for publishing on Roblox | If you are discovering programming |
| Construct 3 | Quickly prototype 2D | Visual interface | Outside the Roblox ecosystem | If you mainly want to test a 2D idea |
| Unity | Build larger projects | Finer control | Longer learning curve | If you are targeting another game engine |
| Roblox Studio | Create and publish on Roblox | Direct route to the platform | Requires mastering the tool | If the goal is a published Roblox game |
The decisive criterion is not the tool’s reputation, but the result you want to publish. If you are looking for a first experience on Roblox, Studio avoids detours; if you only want to learn the basics of video games, Scratch or Construct 3 can remain simpler at first.
What mistakes do beginners make the most?
The most costly mistakes almost always come from the scope: too big, too soon, too cluttered. When creating a first Roblox game, you save time by reducing the map, saving often, and testing after each change.
- Wanting a map that is too vast: the game becomes empty and the project drags on.
- Adding too many decorative objects: the scene becomes hard to read and the player gets lost.
- Copying a script without understanding its role: the error becomes difficult to diagnose.
- Forgetting to save: a wrong action can erase an entire session.
- Publishing before testing: the first player feedback then reveals avoidable bugs.
The first blockage is not technical; it is often a project too ambitious for a first try. If you keep your idea in a short version, you learn faster and publish more cleanly.
Useful sources to consult
Good sources are short, official, and up to date. For Roblox Studio, keep the Roblox Create documentation and the official Build an Obby lesson handy; they cover the tool, the landmarks, and the logic of a first project.
- Official Roblox Create Documentation — useful for the interface, updates, and learning resources.
- Official Build an Obby Lesson — useful for following the logic of a simple first project.
Keep these pages open during your trials, because menus sometimes evolve without changing the basic logic. The official documentation remains the best base when you are looking for a setting, a panel, or a publishing step.
What to do after the first publication?
The good first Roblox Studio game is small, clear, and publishable. You can then add score, a better map, or monetization later, but only after validating the playable version.
If you have finished this first project, you already know the essentials: install, read the interface, test, fix, and upload. This is the useful foundation; the rest is just a power-up, building one mechanic at a time.
Key takeaways
- 🧱 Start small: an obby or a mini-map is enough to learn.
- 🧭 Open only the panels useful at the start to keep a readable interface.
- 🧪 Test after each addition; a bug visible early costs less to fix.
- 🔧 A first Lua script should trigger a single simple action.
- 🚀 Publish a clean version before thinking about monetization.
Your questions before publishing
Do you need to know how to program to start?
No, you can start without knowing how to program. Roblox Studio allows you to learn gradually, first by adding objects and very simple logic. Lua becomes useful as soon as you want interaction, a score, or a checkpoint.
Is Roblox Studio free?
Yes, Roblox Studio is free according to the official Roblox documentation. You can install it without paying to create, test, and publish a basic experience. The sensitive point is not the price, but the working method and the quality of your trials.
How long does it take to make a first game?
A first playable experience is built faster when the project remains very short. A simple obby or a mini-map is well suited for a first try, whereas a too ambitious game will make you waste time fixing still unstable basics.
Can you create a game without being good at graphics?
Yes, and that is actually the right way to start. A first Roblox game must first be readable and playable. The visual style can improve later, but game logic and stability come before aesthetics.
What should you check before publishing?
Check the name, the save, the visibility, and the result of the last test. If the game loads poorly or if a script blocks the player, delay the publication. A clean first launch is better than a too quick online release.