Setting Up an Ubuntu Server from A to Z: The Beginner’s Guide to Installing, Securing, and Managing Your Machine
If your goal is to set up an Ubuntu server without getting lost in jargon, you are in the right place. The guide follows the actual order of operations: installation, first access, updates, basic security, and daily administration. In the end, you will have a clean server, accessible via SSH, protected by a firewall, and ready to host your services.
We will proceed very concretely, with simple steps to execute and checks at each key stage. The idea is not just to get Ubuntu Server running, but to make it operational, manageable, and less exposed from the first few minutes.
In brief
🧭 Start by choosing your platform: home machine or VPS, depending on your budget and level of autonomy.
🔐 After installation, create a sudo user, test SSH, then enable UFW before exposing any services.
🛠️ Update the system immediately, install basic tools, then set the time and locale for readable logs.
📦 Next, prepare your services: web, storage, database, or application, without skipping security steps.
Ubuntu Server or Ubuntu Desktop: which to choose?
For setting up an Ubuntu server, the right choice is almost always Ubuntu Server. It is lighter, more straightforward, and avoids installing an unnecessary graphical interface if you manage the machine remotely. Ubuntu Desktop remains useful for a local test machine, but it complicates the setup without providing real benefits for a server.
In practice, choose Ubuntu Server if you want to host services, manage the machine via SSH, or keep a clean installation. Keep Ubuntu Desktop only if you need a full visual environment to learn locally or for hybrid use.
- Ubuntu Server: more sober, easier to maintain, better suited for hosting.
- Ubuntu Desktop: graphical interface, convenient for a workstation, less relevant for a server.
- Remote access: the server is better managed via SSH than with a heavy graphical interface.
Should you have a home server or a VPS?
The right answer mainly depends on your priority: control or simplicity. A home server gives you more privacy and lower costs over time, while a VPS is quicker to set up, easier to manage, and reduces risks related to local hardware, Internet outages, and power failures.
| Criterion | Home Server | VPS |
|---|---|---|
| Privacy | Very good, as data stays with you | Good, but the infrastructure remains with a hosting provider |
| Cost | Often lower initial and recurring costs | Monthly subscription required |
| Setup | More hardware and network steps to check | Faster to deploy |
| Maintenance | You also manage the hardware and connection | Easier to maintain daily |
| Risk of outage | Depends on electricity and your Internet access | Less risk of local failure |
| Latency / bandwidth | Strongly depends on your line | Often more stable and homogeneous |
For a beginner, the VPS is often reassuring because it limits hardware issues. At home, you keep control over everything, which is very comfortable if your goal is to host a personal cloud, photos, contacts, calendars, or even a media library. In both cases, the configuration foundation remains the same.
The best choice is not the one that seems the most “powerful,” but the one you can maintain stress-free every day.
Prepare the equipment and access
Before installing anything, check that the machine can handle the role of a server. The recommended minimum configuration remains simple: one or more 2 GHz processors, 2 to 4 GB of RAM, 10 to 25 GB of storage, and a fast Internet connection. If the machine already exists, back up its contents before overwriting the disk.
- Processor: at least 2 GHz to stay comfortable with common tasks.
- Memory: minimum 2 GB, 4 GB if you want a bit more breathing room.
- Disk: 10 to 25 GB for a clean system base.
- Network: stable connection, especially if you plan to administer remotely.
- Backup: essential if the machine is not new.
If you are using a physical machine, also prepare the installation media and access to the BIOS or boot menu. If you are using a VPS, keep your hosting credentials handy. Once this groundwork is prepared, the installation proceeds much more smoothly.
Install Ubuntu Server step by step
The first boot of Ubuntu Server goes much better when you always follow the same logic: installation media, basic settings, creation of the administrator account, then reboot. The goal is to have a machine that boots cleanly, without having to fix anything afterwards.
- Download the correct version of Ubuntu Server, then verify that you are using the server edition and not a desktop image.
- Create the installation USB key with the downloaded image, then boot the machine from it.
- Launch the installer and set the language, keyboard, network, disk, and hostname.
- Create the administrator account during installation to avoid working daily with the root account.
- Complete the reboot and verify that the system properly reaches the console or the intended remote service.
Choose the right settings during installation
Take the time to properly validate the keyboard, network, and disk. These are the settings that waste the most time when left to chance. If the installer offers to enable the SSH service, keep this option in mind if you plan to administer the server remotely from the start.
The biggest beginner’s trap is not the installation itself: it is neglecting the administrator account and remote access at first boot.
Take control of the server with SSH
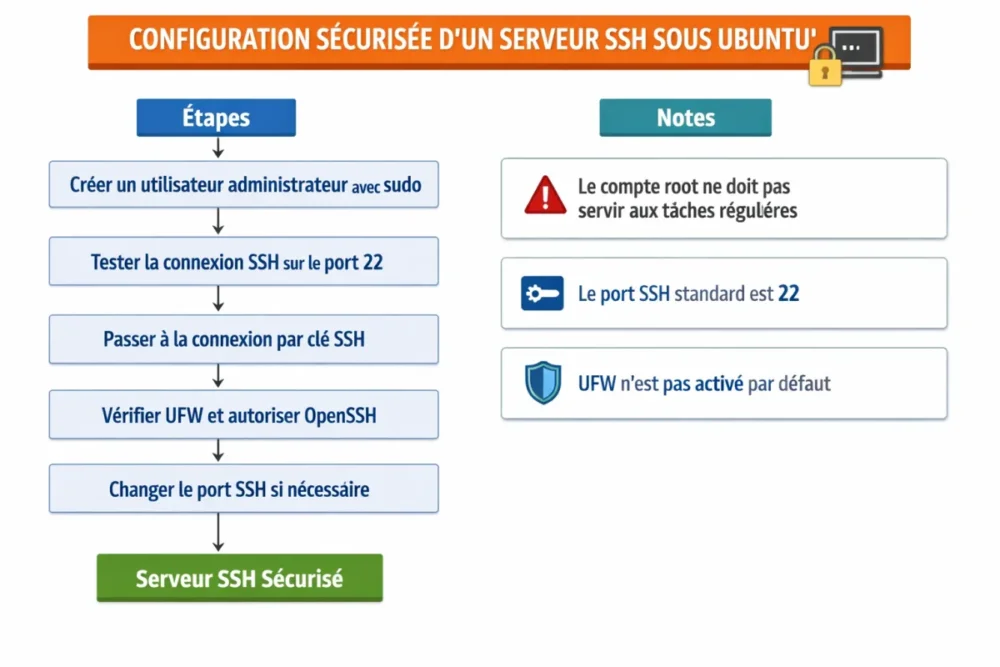
On Ubuntu Server 22.04, the standard SSH port 22 is used by default, and the root account exists after installation. However, it is recommended not to use it for everyday tasks. The cleanest approach is to create a dedicated user with sudo rights, test access, then strengthen the configuration once everything works.
Create an administrator user
First create a dedicated account, set its password, then add it to the sudo group. This trio prevents you from operating directly as root and gives you a healthy base to administer the server.
useradd -m -s /bin/bash myuser
passwd myuser
usermod -aG sudo myuser
These commands do three simple things: they create a home directory, set a password, then grant administrative rights. The expected result is an account ready to connect and run sensitive commands with sudo.
Log in with a password then with an SSH key
Start with a classic login to verify that everything responds. Then switch to the SSH key, which is more convenient and much more robust than a password alone. In short, the key limits automatic attempts and makes access cleaner for regular administration.
Once the connection is validated, open the SSH configuration file with vim. The editor is often used on servers, and it can be installed with sudo apt install vim. Vi/Vim works with three modes: normal for navigation, insert for writing, and command for saving or searching.
sudo apt install vim
sudo vim /etc/ssh/sshd_config
In this file, the idea is simple: disable regular root usage and, if needed, prepare an unused port to reduce unauthorized connection attempts. Make this change only after verifying that your new user works perfectly, otherwise you risk locking yourself out.
Strengthen remote access without breaking the connection
When SSH responds correctly, you can go further. The good practice is to keep a backup access, test a new session before any sensitive modification, and only cut off the old access after validation. This caution avoids silly disconnections, the kind that make you lose an hour over a single misconfigured line.
On a server, the golden rule is simple: secure access first, then harden.
Update the system and install useful tools
Once the connection is established, immediately proceed with updates. This is the first real system hygiene measure on an Ubuntu server. The goal is to apply available patches, then install basic tools to work comfortably at the terminal.
sudo apt update
sudo apt upgrade -y
sudo apt install vim curl git htop unzip
This block does exactly what is expected: it updates the software base and adds some practical tools for administration. vim is used for configuration files, curl helps test requests, git fetches code, htop monitors processes, and unzip often comes in handy.
Also set the time and time zone. Ubuntu Server 22.04 starts by default in UTC, which is technically clean but not always ideal for reading logs without thinking. A correct local time greatly simplifies incident analysis.
sudo timedatectl set-timezone Europe/ParisIf needed, take the opportunity to verify the consistency of the hostname and network context. The more you take care of these small settings at the start, the less time you will waste deciphering logs later.
Secure the server from the first minutes
Basic security is built just after SSH access and updates. On Ubuntu Server 22.04, there is no firewall enabled by default. This is precisely why you need to install a minimal foundation before exposing other services. The winning duo remains sudo user + UFW.
sudo ufw allow OpenSSH
sudo ufw enable
The first line allows SSH, the second activates the firewall. It’s simple but essential. Once the firewall is in place, you start from a cleaner base and already limit unnecessary connections.
Manage accounts and permissions properly
The root account exists, but it should not become your working account. For routine administration, a personal account with sudo is more than enough. This reduces the risks of brute force manipulation and keeps a clearer record of your actions on the server.
- Do not use root for repetitive tasks.
- Keep only one main administrator account initially.
- Test sudo rights before closing more permissive accesses.
- Harden SSH only after validating backup access.
Go a step further if the server is exposed to the Internet
If your server receives public traffic, monitor suspicious connections and complement the security base with an abuse blocking mechanism. The most important thing remains not to stack hardening measures before verifying that standard access still works. Otherwise, you gain theoretical security but lose practical usability.
Prepare the server according to your goal
An Ubuntu server can serve as cloud storage, host photos, contacts, calendars, tasks, or even movies and TV series. In other words, the system base you just configured serves as a starting point for very different uses. The right order always remains the same: system, access, security, then service.
Hosting a website
For a website, you will generally choose between Nginx and Apache. The important thing is not to chase the “trendiest” name, but to choose a web server that you will know how to maintain, configure, and troubleshoot. Start small, with a single and clear service.
Adding a database
If your project depends on data, the most common trio remains MySQL, MariaDB, or PostgreSQL. Again, the right method is to install only one engine at first, document its role, then connect your application properly. This avoids the “catch-all” server that is impossible to understand six months later.
Deploying a simple application
For a homegrown application, think in blocks: environment variables, systemd service, and automatic restart. This approach makes the application more stable after reboot and easier to monitor. The server is not magical: you have to tell it precisely what to launch and in what order.
Setting up basic maintenance
A server is not “finished” the day it is installed. Real life begins when you plan backups, checks, and regular updates. This is where your configuration gains robustness, especially if the machine hosts something useful.
- Plan backups before the need becomes urgent.
- Monitor disk space to avoid silent blocking.
- Read logs when a service behaves badly.
- Keep security updates under control.
- Keep a configuration note with your ports, services, and accounts.
On the ground, the most useful remains having a short routine: check disk space, confirm that no critical service has dropped, then launch updates when the window is quiet. This simple rhythm avoids many unpleasant surprises.
Common mistakes to fix immediately
The first blockages on an Ubuntu server are often the same. Spotting them early saves you time, and sometimes even prevents you from having to start all over. Here are the most common cases, with the associated correction logic.
- Unable to connect via SSH: check the service, the port, the firewall, and the account used.
- The firewall blocks everything: first allow OpenSSH before activating UFW.
- The server responds in UTC: set the time zone to read logs correctly.
- The disk fills up too quickly: monitor logs, backups, and temporary files.
- You are still working as root: switch to a dedicated sudo account for daily administration.
The most classic remains SSH lockout after a too-quick modification. The right reflex is always to keep a backup access method open until the new access has been tested. It’s trivial, but it’s what separates a well-prepared server from a machine you have to catch up with in an emergency.
Optimizations and best practices
Once the base is in place, a few habits make a huge difference. These are not gadgets. These are the details that transform a fragile installation into a truly maintainable machine.
- Test each change before cutting off the old access.
- Favor SSH keys as soon as the connection works.
- Document your ports and accounts in a simple file.
- Store backups off the main server.
- Keep an eye on logs when you add a service.
In other words, a simple, readable, and repeatable configuration is better than a theoretically sophisticated architecture that is impossible to maintain. This is especially true when starting out: the most solid server is often the one you still perfectly understand three months later.
Final check before commissioning
Before considering your Ubuntu server ready, mentally go through the final checklist: an administrator user exists, SSH works, the firewall filters connections, the time is correct, updates are applied, and a backup strategy is planned. If any of these components is missing, fix it immediately.
At this stage, you have a solid foundation to run a web service, a personal cloud, or a simple application. You haven’t just installed a system: you have truly laid the groundwork for a server usable on a daily basis.
Key takeaways
- 🧱 Ubuntu Server is the best starting point for a clean and lightweight server.
- 🔑 Create a sudo user before touching advanced security.
- 🛡️ UFW must be enabled as soon as SSH is validated.
- ⏱️ Set the local time to read logs without confusion.
- 💾 Backups and disk monitoring prevent unpleasant surprises.
FAQ
Should the root account be used to administer Ubuntu Server?
No, that is not the right reflex for daily use. The root account exists after installation, but it is better to create a user with sudo rights. This way, you keep better control over your actions and limit mistakes.
When should the SSH port be changed?
Only after verifying that a reliable connection already works with your new user and, if possible, with an SSH key. Changing the port too early can lock you out if the firewall or SSH file is misconfigured. The simple rule: test first, then harden.
What to do if UFW blocks access to the server?
Start by checking that SSH is allowed in UFW before fully activating the firewall. If you lose access, a local console or provider access may be necessary to fix the rule. Hence the importance of proceeding in small steps.
Can Ubuntu Server be used for personal cloud or media?
Yes, this is actually a very common use. An Ubuntu server can host cloud storage, photos, contacts, calendars, tasks, or a media library. The most important thing remains to secure the base before adding these services.
What is the first command to run after installation?
The priority is to update the system with sudo apt update then sudo apt upgrade -y. Then, install basic tools like vim. This small sequence immediately puts you in a clean state to continue configuration.