Site migration without downtime: changing servers without cutting off visitor access
A site migration without downtime is the method that allows moving a site to a new server without showing errors to visitors, breaking forms, or losing data along the way. The principle is simple on paper: prepare, synchronize, test, switch the DNS, then monitor. In practice, it is mainly a matter of discipline and order of operations.
If you want to do it properly, the goal is not just to “copy a site.” You need to reproduce the environment, reduce the impact of DNS propagation, manage writes during the transition, and keep a rollback plan ready to use. This is exactly what this guide makes you execute, step by step.
In brief
🔧 Reduce the DNS TTL 48 hours before the switch to speed up propagation and limit waiting.
🧩 Keep both servers active while synchronizing files, database, and critical settings.
🧪 Test the new server via the hosts file before touching the public DNS.
🚨 Freeze writes at the right moment if the site receives orders, registrations, or sensitive changes.
What result to aim for at the end of a site migration without downtime?
The expected result is a site that responds from the new server without visible interruption to the user, with the same content, the correct SSL certificates, coherent redirects, and an up-to-date database. In other words, the switch must be invisible, except for you who control stability, logs, and DNS propagation.
How to migrate a site without downtime in practice?
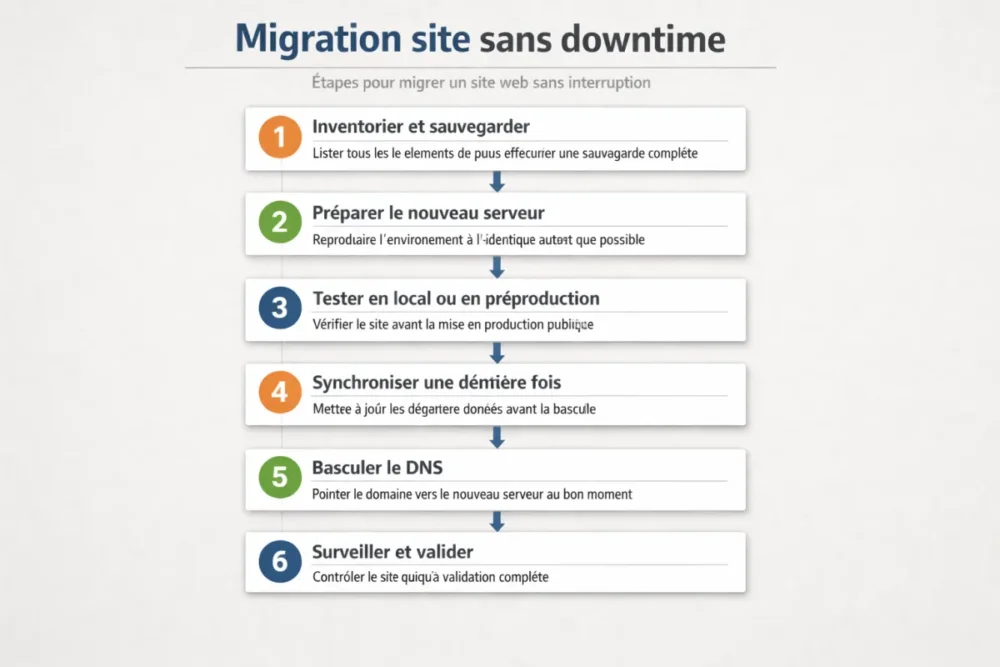
The proper sequence consists of six steps. First, you inventory and back up everything. Then, you prepare the new server identically. Next, you test locally or in preproduction. After that, you synchronize the data one last time, switch the DNS at the right moment, and monitor the site until full validation.
- Inventory files, database, SSL, cron jobs, emails, and integrations.
- Back up before any copying, with a local version and an external copy.
- Prepare the new server identically, or with documented differences.
- Test the site before public production deployment.
- Synchronize the latest data and switch the DNS.
- Monitor after the logical cutover, even if the site does not visibly go down.
Prepare the migration upstream
Preparation accounts for half the result. If you skip this step, you will find yourself fixing version errors, broken permissions, or missing data at the worst moment. The right reflex is to list everything, back up everything, and document everything before opening any terminal.
Make a complete inventory of the site
Start by noting the components actually used by the site. This avoids the classic mistake: “we forgot the cache, the cron, or the certificate.” Write everything down in a migration file, then compare it to the target server. This document will also serve as a safety net if you need to roll back.
| Item to inventory | What to note | Why it’s critical |
|---|---|---|
| Site files | Code, media, themes, plugins, assets | Prevents missing files or inconsistent versions |
| Database | Name, user, encoding, structure | Ensures clean import and intact data |
| SSL certificate | Type, domain name, expiration date | Avoids security alerts after the switch |
| Cron and scheduled tasks | Frequency, scripts run, dependencies | Preserves sending, syncs, and automatic processing |
| Emails and related services | Accounts, SMTP relays, webhooks, APIs | Reduces functional breaks after migration |
Reduce risks before the transfer
Before copying anything, make a complete website backup. Back up files, databases, email accounts, SSL certificates, and custom configurations. The double safety net remains simple: a local backup and a cloud backup. If one fails, the other saves you.
- Validate the available disk space on the target server.
- Check the software versions required by the site.
- Lower the DNS TTL to about 300 seconds approximately 48 hours before the switch.
- Warn teams if the site handles orders, registrations, or sensitive content.
The real risk is not copying the site, but the moment when the old and new servers are no longer synchronized.
Reproduce the environment on the new server
The goal is not to create an “almost identical” server. You must match the original environment on the points that matter: PHP engine or other runtime, web server version, database, extensions, permissions, paths, and environment variables. The more precise the match, the fewer invisible incompatibilities you create on the first test.
Install the same technical stack
Compare the system, web server version, PHP or runtime version used, as well as necessary modules. This comparison is even more important if the site depends on specific extensions, rewrite rules, or a particular application cache. On a WordPress or custom application, a small version difference can trigger major side effects.
Restore data
Copy the site files, import the database, then check permissions. Once the content is restored, verify paths, internal URLs, environment variables, and connection settings. If the site relies on a cache, temporarily disable it during tests to avoid false positives.
If the new server does not reproduce the old one identically on critical points, migration without downtime becomes a lottery.
What checks to perform before touching the DNS?
Before modifying any public entry, you must validate the site on the new server in an isolated environment. The idea is to check rendering, forms, connections, and areas with strong business logic, without exposing the new server to visitors. This is where the hosts file becomes your best ally.
Test via the hosts file
Redirect your workstation to the new server address with the hosts file, then open key pages as if the DNS had already switched. Compare the homepage, deep pages, user login, cart, forms, and confirmation pages. As soon as a discrepancy appears, fix it before public launch.
- Check internal links and redirects.
- Test dynamic page generation.
- Validate forms and transactional emails.
- Check the SSL certificate and browser warnings.
Performing the Switch Without Downtime
The DNS switch must occur once propagation has been prepared and when traffic is as low as possible. On an editorial site, this can happen without strictly freezing writes. On a store or an application, it is often necessary to temporarily block actions that modify data to avoid inconsistencies between the old and new servers.
Freeze Writes if the Context Requires It
Activate a maintenance mode or block critical actions at the scheduled time: orders, registrations, profile modifications, publications, or payments. Then, perform a final synchronization of files and the database. This last step is brief, but it makes all the difference between a clean migration and a site with diverging data.
Change the DNS at the Right Time
Update the domain address to the new server, then monitor the propagation. The old server must remain active during the transition, as some visitors will continue to reach it as long as the DNS has not propagated everywhere. This is normal, and it is precisely why the TTL is prepared in advance.
If there is doubt about the data, suspend the switch. Forcing production deployment often costs more than a 30-minute delay.
How to Verify That the Migration Is Truly Complete?
A migration is not finished when the DNS points to the new server. It ends when all technical and business checks are green. You must therefore verify the site as your visitors would, but also as your production server would: logs, certificates, cache, forms, connections, and performance.
Immediate Technical Checks
Test the homepage, navigation, forms, SSL certificate, redirects, and dynamic pages. Open the server logs and application logs to spot silent errors. If a CDN or intermediate cache exists, purge it and verify that the served content matches the expected version.
Business Checks
On an e-commerce site, verify orders, payments, transactional emails, and customer accounts. On an editorial site, check publication, internal search, and contact forms. On an application, test sessions, permissions, and critical flows. In short, do not settle for “the homepage displays.”
What to Do If the Migration Goes Wrong?
The rollback plan must be ready before the switch, not after. If you observe data corruption, a critical error, abnormal performance, or a blocking incompatibility, you must be able to revert to the old server quickly. Rollback is not a failure: it is insurance.
Triggering the Rollback at the Right Time
Go back as soon as the problem affects data consistency, availability of key functions, or the overall stability of the site. Keep in mind that a partially broken site costs more than a few minutes of waiting. Downtime-free site migration does not allow improvisation in production.
Reverting Cleanly
Reactivate the old server, restore the latest DNS settings if needed, and reinject any data entered during the transition window. Then, document precisely what failed. This record will prevent you from repeating the same scenario identically during the next migration.
Special Cases to Handle
Some sites require more finesse than others. A downtime-free site migration on an online store or an application with heavy writes is not managed like a simple blog. You must then monitor the final synchronization, locking of critical writes, and external services connected to the site.
| Type of Site | Main Point of Vigilance | Action to Plan |
|---|---|---|
| Showcase Site | Static pages and contact form | Test rendering, SSL, and redirects |
| Blog | Database and media | Check imports, cache, and permalinks |
| Online Store | Orders, stock, payments | Freeze critical writes and synchronize at the last moment |
| Web Application | Sessions, permissions, API | Verify routes, credentials, and integrations |
E-commerce site or application with heavy writes
On these systems, even the slightest write during the switch can create a discrepancy between the two environments. The right approach is to block sensitive operations, complete the final synchronization, then reopen access only after verification. It’s less glamorous than a “live” migration, but much safer.
Migration with CDN, cache or external services
If a CDN or application cache is in place, you need to check the origin, purge cache layers, and control webhooks or external integrations. Otherwise, you risk displaying outdated content while the server is already correct. This lag is one of the most frustrating traps to diagnose afterward.
Common mistakes to avoid
Most failed migrations don’t break because of an exotic bug. They break because of a forgotten detail, an incomplete test, or a switch done too quickly. The cases below repeatedly appear in production, on showcase sites as well as on more sensitive shops.
- Forgetting to reduce the TTL: DNS propagation drags on and prolongs the overlap between old and new servers.
- Not checking the database: the import passes, but tables or encodings cause problems on first display.
- Ignoring permissions: media, caches, or exports can no longer be written correctly.
- Cutting off the old server too early: some visitors still arrive on the old IP during propagation.
- Testing only the homepage: deep pages, forms, and connected areas often reveal the real errors.
Optimizations and best practices
A clean migration is not just about avoiding downtime. You can also take advantage of the server change to upgrade the installation, better document it, and reduce risk during future moves. What is done properly once is done much faster the next time.
- Document versions, paths, DNS settings, and technical exceptions.
- Keep a rollback plan short, readable, and executable within minutes.
- Choose a migration window during low traffic.
- Keep verified backups, not just “made” ones.
- Monitor logs and metrics during the hours following the switch.
In short, a zero downtime site migration relies less on a magic tool than on a clean sequence: inventory, backup, duplication, tests, final synchronization, DNS switch, and verification. When each step is controlled, the server change becomes a mastered operation, not a leap into the void.
Key takeaways
Key points to remember:
🧭 Preparation reduces invisible errors even before copying the site.
🛡️ Lowering the DNS TTL to 300 seconds speeds up cleaner propagation.
🔁 Final synchronization protects data during the transition.
⚙️ Testing via hosts validates the new server without exposing visitors.
🚑 The rollback plan must be ready before the switch, never after.
FAQ
How long does a zero downtime site migration take?
The duration mainly depends on the site size, data volume, and testing time. Lowering the TTL often requires anticipating about 48 hours, then the switch itself can remain short if everything has been properly prepared.
Should the site be put into maintenance mode?
Not always. For a low-interaction site, a well-prepared switch can occur without displaying maintenance. For a shop or an application with heavy writes, a temporary freeze of sensitive actions is often necessary to avoid data discrepancies.
Why test with the hosts file?
Because it allows you to see the new server before public DNS propagation. You can check pages, forms, and dynamic behaviors without impacting visitors or changing the domain visible to everyone.
When should the rollback be triggered?
As soon as a problem affects data consistency, security, or key site functions. If you hesitate, it’s better to revert to the old server and fix calmly than to let a fragile production run.
What to check after the DNS switch?
Check the SSL, redirects, dynamic pages, logs, forms, and transactional emails. If a cache or CDN is involved, make sure it is serving the version from the new server and not outdated content.